Webbing is the load-bearing layer of the chair. Everything that follows — springs, stuffing, calico, top fabric — is supported by the woven jute webs at the bottom of the seat.
Get the webbing right and the rest of the construction has a sound foundation; get it wrong and the chair will sag in a year, however good the work above. This chapter walks you through every aspect: the right material, the layout pattern, how to tack it on, how to tension it, and how to know when you've tensioned it correctly.
The right webbing for the job
The trade default for upholstery webbing is English jute, 10-strand, 50 mm wide (paid link) — plain yellow-tan, or in the black-and-white striped weave. Both are functionally equivalent for most jobs, with the black-and-white slightly heavier and slightly preferred for sprung seats. It's sold by the metre off rolls; allow about a metre per webbing strip and expect 8–12 strips per seat depending on size.
Avoid the cheaper 6- or 8-strand jute sold in DIY shops as “upholstery webbing” — it's too thin to carry spring loads and stretches sloppily under tension. Avoid elastic webbing for any traditional work; it's for modern foam-and-staple sofas only. And avoid Pirelli rubber webbing on anything you intend to last: it perishes in a decade.
The general rule: match webbing to construction. Jute for any sprung seat. Jute for any stuffed seat without springs. Elastic only on modern foam-and-zigzag, where the elastic tension is meant to be part of the suspension system.
The 8-strand interlace pattern
The standard webbing layout for a sprung domestic seat is four horizontal webs and four vertical webs interlaced — eight strands total, woven over and under each other in a basket pattern. This is the layout you'll find in any chair that hasn't been short-changed during construction. On a smaller chair — a dining seat, a footstool — you can drop to 3 × 3; on a larger sofa seat you'd go to 5 × 5 or 5 × 4.
The interlace matters. Webs that simply lie one set on top of the other, without weaving, shift over each other under load and cause the strands to bunch unevenly. Interlaced webs lock together at every crossing and distribute load evenly. The cost is about ten extra minutes per seat; the benefit is decades of even support.
The five-tack pattern: how each strand is fixed
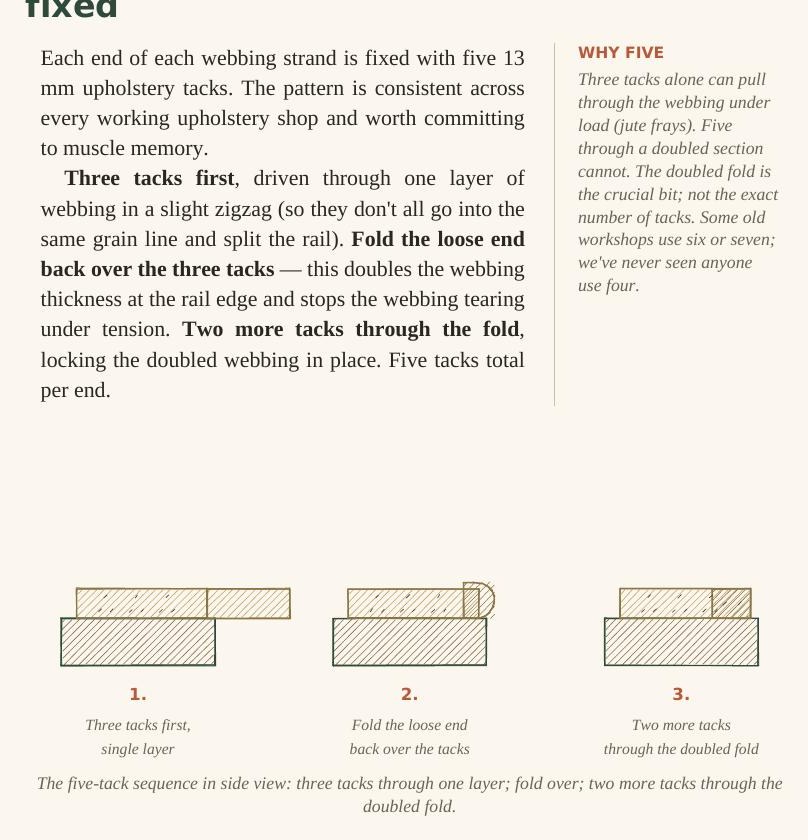
Each end of each webbing strand is fixed with five 13 mm upholstery tacks (paid link). The pattern is consistent across every working upholstery shop and worth committing to muscle memory.
Three tacks first, driven through one layer of webbing in a slight zigzag — so they don't all go into the same grain line and split the rail. Fold the loose end back over the three tacks; this doubles the webbing thickness at the rail edge and stops the webbing tearing under tension. Then two more tacks through the fold, locking the doubled webbing in place. Five tacks total per end.
Three tacks alone can pull through the webbing under load — jute frays. Five through a doubled section cannot. The doubled fold is the crucial bit, not the exact number of tacks. Some old workshops use six or seven; we've never seen anyone use four.
Tensioning with a webbing strainer
The trick of webbing is to fix it tightly enough that the springs above can compress without the webbing slackening under load, but not so tightly that the jute is permanently overstrained. That balance is what a webbing strainer (paid link) is for — it lets you pull each web to a consistent, repeatable tension before the second end is tacked, which you simply can't achieve pulling by hand.
Tack one end first with the full five-tack pattern. Then strain the loose end across the frame, fix it under tension with three tacks, release the strainer, fold and lock with two more. A correctly strained web should sound like a low drum when tapped and barely deflect under a firm thumb.
Tools & materials for this job
- English jute webbing, 10-strand, 50 mm (paid link)
- 13 mm upholstery tacks (paid link)
- Webbing strainer (stretcher) (paid link)
- Magnetic upholstery hammer (paid link)
If you'd sooner hand the chair over, that's our day job. Send a photo and we'll give you an estimate. Get a quote on your piece →