What knots does an upholsterer need?
Four will carry you through almost any job. The slip knot starts every run of twine and lets you set tension before locking it. The half hitch locks that tension off and is the workhorse of spring lashing and stitching. The lock stitch spaces a row of stitches evenly and stops each one loosening the last, which is what holds a stitched edge together. And the tailor’s or bow knot ties off a button so it can be released later without cutting the cover. Learn them with twine in hand rather than from a diagram; the tension is half the knot.
A visual reference for the knots and stitches used throughout the book — each one shown as a diagram, with a brief note on where it's used and how it works.
The full technique lives in the relevant stuffing and springing chapters; this is the lookup. Alongside each diagram is a short step list, because a knot is far easier to follow in words and a picture together than in either alone.
Stitches
Bridle stitch
A loop of mattress twine sewn into the hessian (US: burlap), sitting raised about 25 mm above the surface. Loose stuffing is tucked under the loop to stop it shifting. Three or four loops per bridle row, with rows about 100 mm apart.
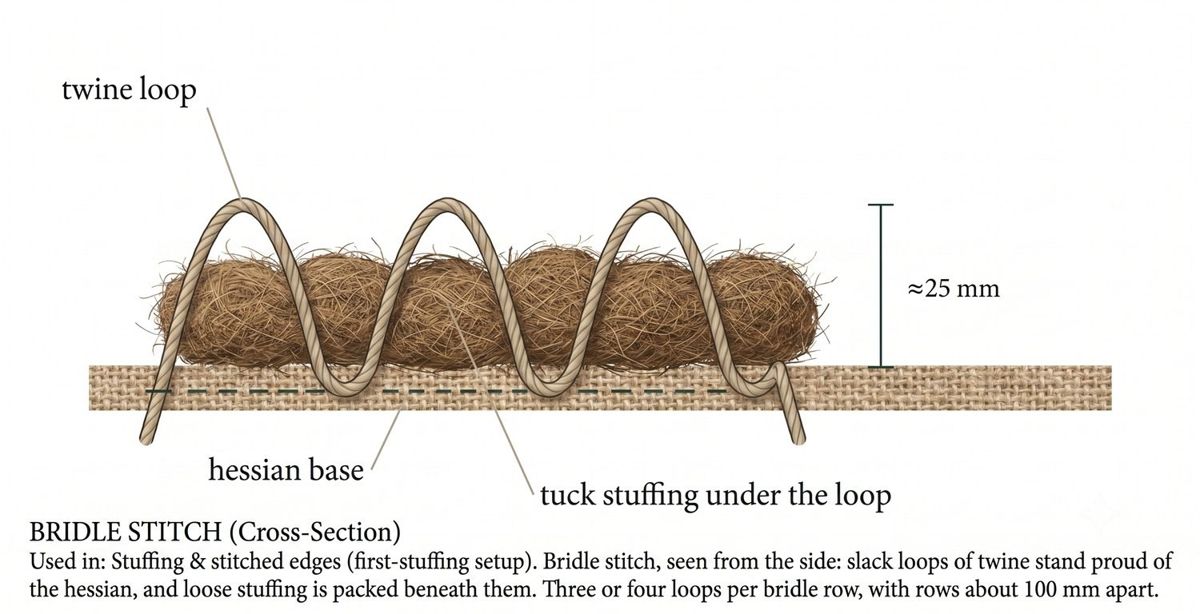
Used in: Stuffing & stitched edges (first-stuffing setup).
Blind stitch
Horizontal stitches passing through the side face of a stuffed pad without exiting the top. Each stitch enters low and exits about 25 mm higher on the same side; pulling tight draws stuffing toward the rail to build the rim. Three rows of blind stitches build the full rim height.
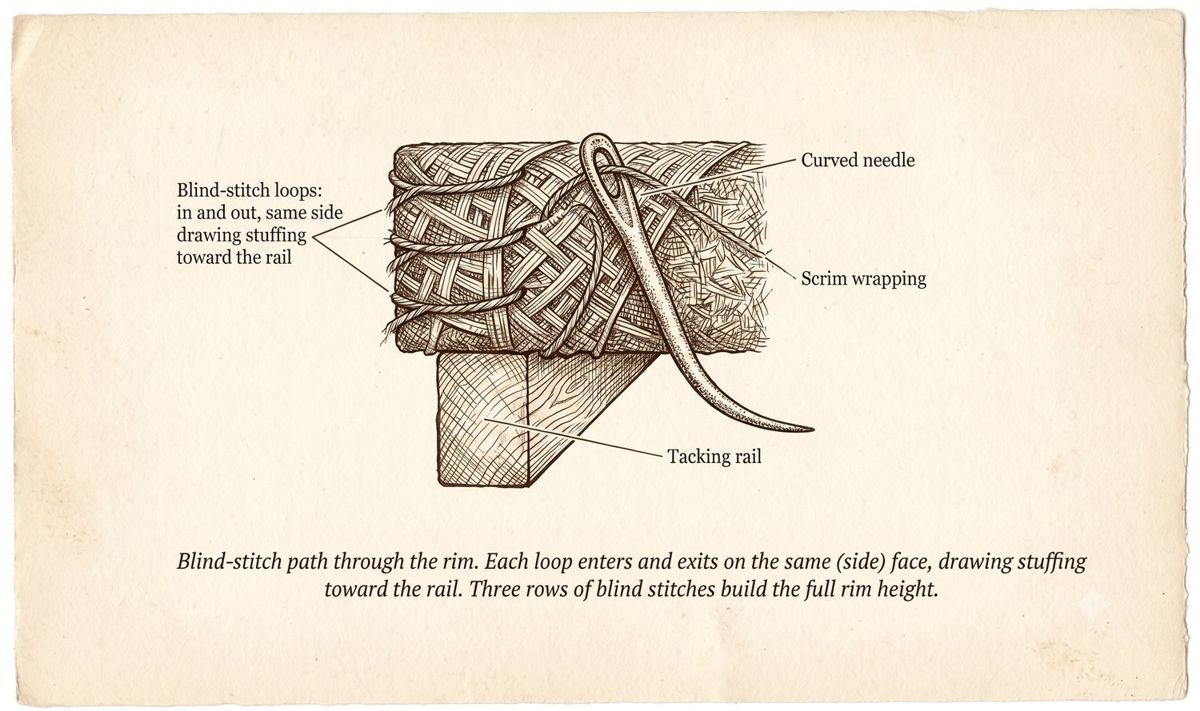
Used in: Stuffing & stitched edges (rim shaping).
Top stitch
A continuous chain of stitches running along the top edge of the pad, locking the rim shape permanently in place. The needle goes in on the side face, out on the top face about 25 mm in from the edge, then back down through the side face 12 mm further along. Visible from above.
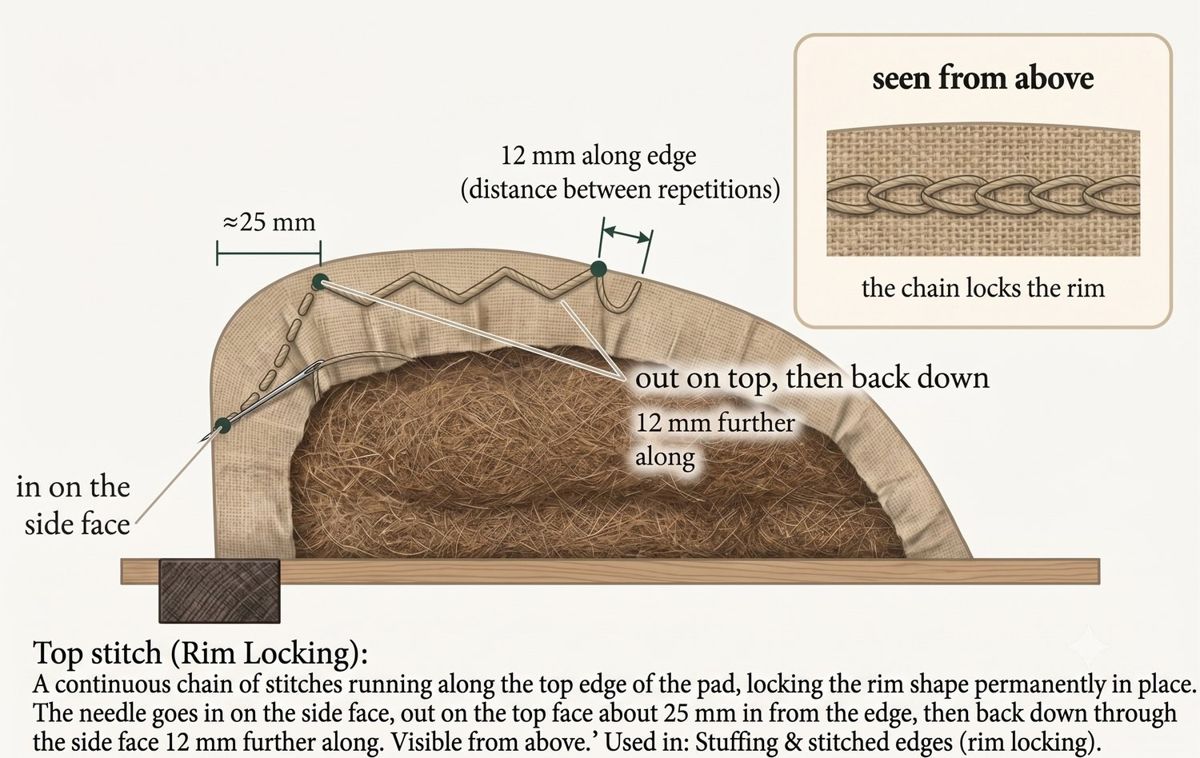
Used in: Stuffing & stitched edges (rim locking).
Knots
Clove hitch
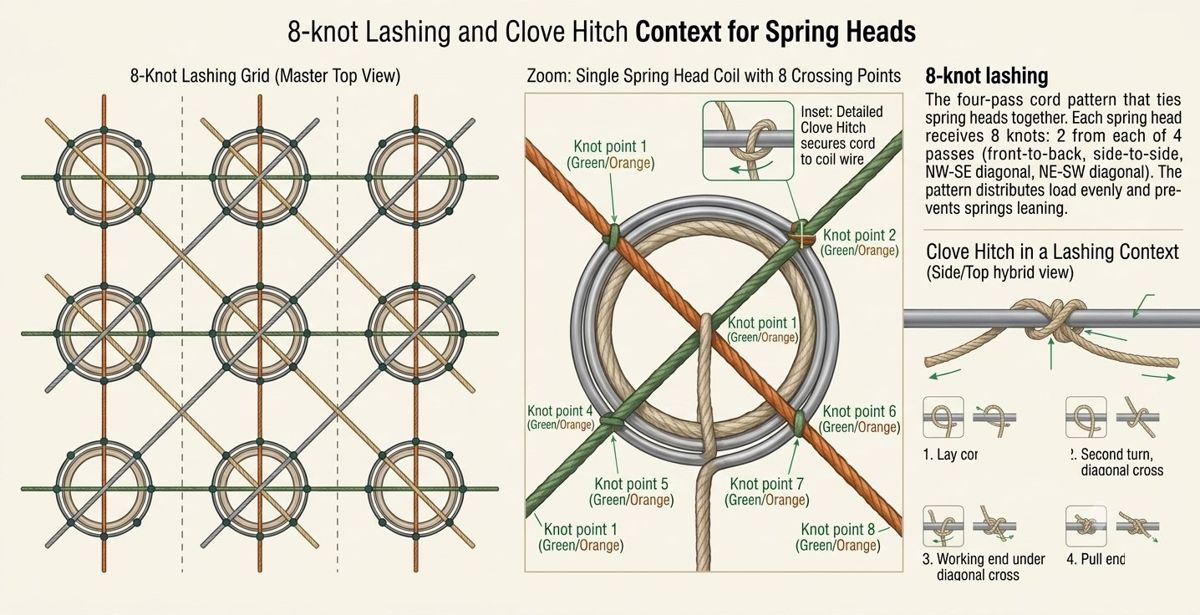
The knot used to secure laid hemp cord around the top coil of a spring. Two wraps around the coil, each crossing over the cord's working end. Hand-tightened; it locks under load.
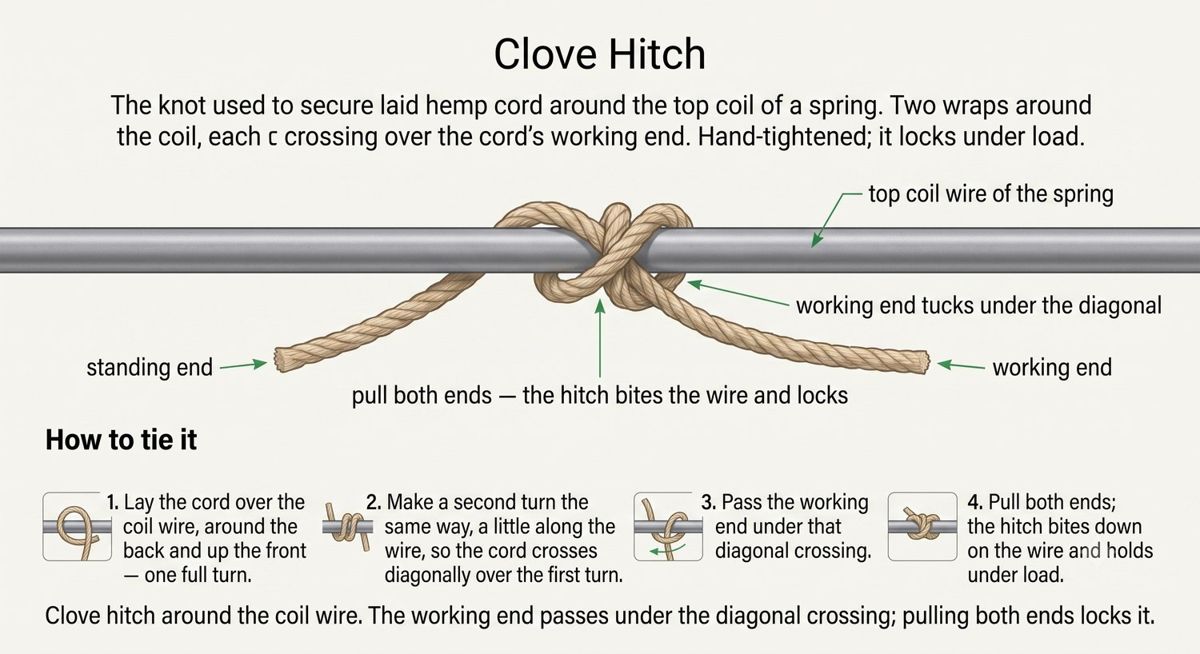
How to tie it
- Lay the cord over the coil wire, around the back and up the front — one full turn.
- Make a second turn the same way, a little along the wire, so the cord crosses diagonally over the first turn.
- Pass the working end under that diagonal crossing.
- Pull both ends; the hitch bites down on the wire and holds under load.
Used in: Traditional springing (eight-knot lashing).
Slip knot
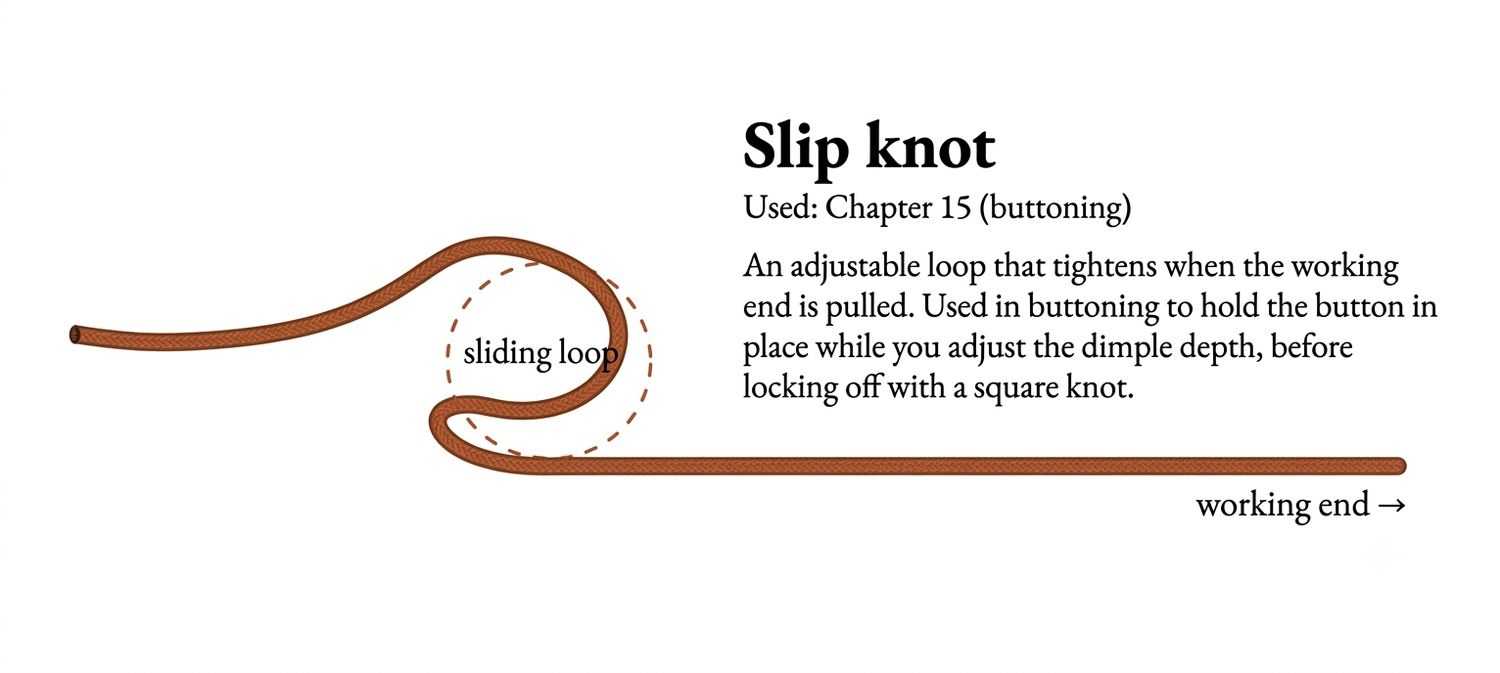
An adjustable loop that tightens when the working end is pulled. Used in buttoning to hold the button in place while you adjust the dimple depth, before locking off with a square knot.
How to tie it
- Pass the twine through the button shank and bring both ends together.
- Form a loop and pass a bight of the working end through it — an overhand loop, left un-pulled.
- Pull the standing end to slide the loop smaller, easing the button down to the dimple depth you want.
- Hold that depth and lock it off with a square knot.
Used in: buttoning & tufting.
Square (reef) knot
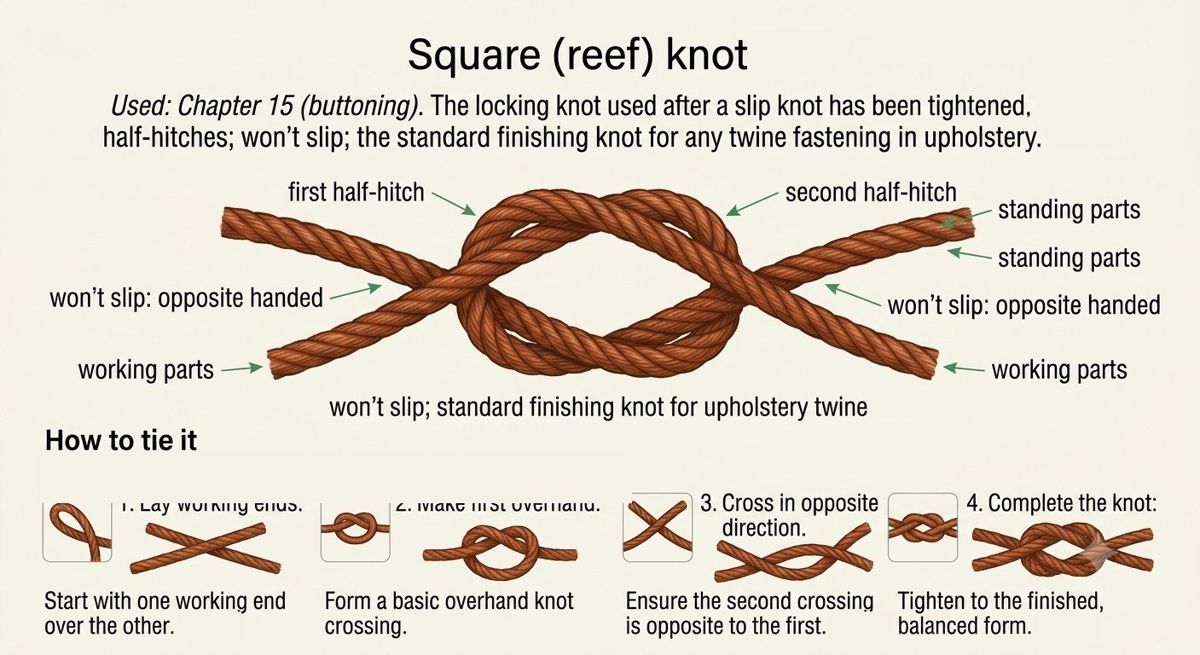
The locking knot used after a slip knot has been tightened to the right depth. Two opposite-handed half-knots; it won't slip, and it's the standard finishing knot for any twine fastening in upholstery.
How to tie it
- Cross the left end over the right and tuck it under — the first half-knot.
- Now cross the new right-hand end over the left and tuck it under — the second, opposite-handed half-knot.
- Pull both ends evenly; the knot lies flat and won't slip. (If it forms a lump, you've tied a granny — undo and reverse the second crossing.)
Used in: buttoning & tufting, and any twine fastening.
What is the 8-knot lashing pattern for springs?
Eight-knot lashing
Each coil-spring head receives eight knots — two from each of four passes of laid hemp cord: front-to-back, side-to-side and both diagonals — tying the spring heads together so the load is shared and no spring can lean under a sitter.
The four-pass cord pattern that ties spring heads together. Each spring head receives eight knots — two from each of four passes: front-to-back, side-to-side, and both diagonals. The pattern distributes load evenly and stops the springs leaning.
Used in: Traditional springing.
Six knots and four stitches — that's the whole vocabulary of traditional upholstery. The next chapter is the historical style guide: the named chair forms and what distinguishes each.