This chapter walks you through the work that no other modern technique replaces: hand-tied coil-spring construction.
Done well, it produces a seat that is comfortable in year one and still comfortable in year sixty. Done badly, it sags in two years and you can hear the springs creak from the next room. Of all the techniques in Part Two, this is the one that most rewards care and patience.
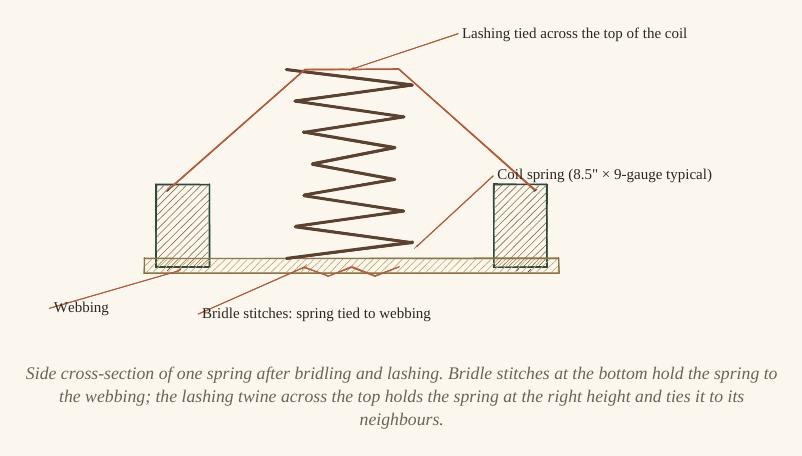
Traditional springing has four stages, all covered here: selecting and placing the right springs in the right pattern; bridling them to the webbing so they stand upright and don't shift; lashing their tops together with the eight-knot pattern that gives the seat its load distribution; and setting the height — the “spring-up” — that determines how the seat will feel. Each stage is straightforward in itself. The skill is in doing all four with consistent attention; the seat will remember any shortcut you take.
Modern factory chairs use clipped-on zigzag springs because they're faster to install. Hand-tied coils feel different in service: more responsive, longer-lived, and adjustable to a particular sitter. They also take a working day per seat — so the choice is as much economic as technical.
Selecting and placing the springs
Coil springs for upholstery (paid link) are sold by height (in inches) and wire gauge — a number, where lower means thicker wire. Domestic seat springs are typically 8.5 inches tall and 9-gauge. Heavier 8-gauge springs go in deep sofa seats; lighter 10-gauge ones in chair backs and edge work. The single biggest beginner mistake is to use the same gauge throughout the chair — the seat needs more spring than the back.
Standard layout: a domestic armchair seat takes nine springs in a 3 × 3 grid. A small chair (a slipper, a tub) takes six in 2 × 3; a two-seater sofa seat twelve (3 × 4); a three-seater fifteen (3 × 5). The rule is roughly one spring per 18 cm × 18 cm of seat area — closer and the springs interfere with each other, further apart and the load isn't distributed well.
Trade suppliers will sell you mixed-gauge sets — 9-gauge for the seat, 10-gauge for the back — in matched sizes if you ask. For one-off jobs, buy in 50s: the price per spring on a 50-pack is roughly half that of buying singly.
Bridling the springs to the webbing
Once the springs are in their grid, they're fixed to the webbing so they stand upright and don't shift in service — with bridle stitches: small loops of mattress twine that pass through the webbing, around the bottom coil of the spring, and back through, knotted off underneath.
Three bridle stitches per spring — one at the front, two at the back — forming a triangular grip on the bottom coil. Use a small curved needle (paid link) and standard waxed mattress twine (paid link). Each spring takes about thirty seconds once you have the rhythm; allow ten minutes for a nine-spring seat. The springs should be slightly compressed by the bridling — held firmly enough they won't fall over when you lift the chair, not so firmly they're pre-loaded before the seat takes any weight.
We bridle from the top side of the webbing, working down through it and tying off underneath. Some old workshops go from below upwards; the result is the same. The point is the knot stays out of the way of the spring's working coil.

The eight-knot lashing pattern
The defining technique of traditional springing is the eight-knot lashing — the four-pass pattern of laid hemp cord (paid link) that ties the heads of all the springs together so they share the load and stay at a consistent height. Each spring head receives eight knots: two from each of four passes — front-to-back, side-to-side, and the two diagonals.
The knots are clove-hitches, tied around the top coil of each spring. The cord is laid tight — tight enough that the springs are slightly compressed, putting them under permanent pre-load so they push back the moment any sitter touches the seat. That pre-load is what makes a hand-tied seat feel responsive even when no-one is sitting on it. The cord is anchored at each rail with a 16 mm tack or staple, wrapped twice around the tack head before driving it home so it doesn't cut into the timber.
Tools & materials for this job
- Upholstery coil springs (8.5″, 9-gauge) (paid link)
- Waxed mattress twine (paid link)
- Laid hemp lashing cord (paid link)
- Curved upholstery needles (paid link)
- 16 mm upholstery tacks (paid link)
- Magnetic upholstery hammer (paid link)
Hand-tied springing is a day's skilled work — if you'd sooner hand the chair over, it's our trade. Send a photo for an estimate. Get a quote on your piece →